Answer these simple questions and we will find you the BEST prices
Which type of solar quotes do you need?

Get Free quotes from loft conversion specialists near you

Save money by comparing quotes and choosing the most competitive offer

The service is 100% free and with no obligation
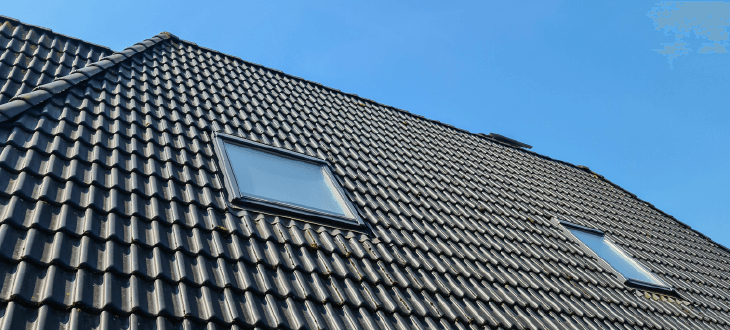
Do You Need Planning Permission for Loft Velux Windows?

- Most Velux loft conversions don’t require applying for planning permission. However, there are exceptions for bigger conversions and houses in conservation areas.
- Unlike standard Velux windows, the Velux Cabrio Balcony generally requires planning permission.
- Installing Velux windows must comply with strict building regulations, regardless of whether you need planning permission.
Adding Velux windows to your loft conversion might seem simple at first, but planning regulations can quickly complicate things.
In this article, we'll break down the planning permission process for Velux windows, tackling common concerns and questions head-on.
Whether you're anxious about navigating legal hurdles, negotiating with neighbours, or dealing with local authorities, we’ve got you covered. Our guide will give you the key information you need to move forward confidently.
Ready to start your loft conversion project? Get quotes from the best installers in your region. Fill out our quick 30-second form and receive up to 3 free quotes from our network of trusted local installers tailored to your home with no extra fees or obligations. Click below to begin!
- Describe your needs
- Get free quotes
- Choose the best offer


Do you need planning permission for a loft conversion with Velux windows?
Typically, you don’t need planning permission for Velux windows they it fall under permitted development loft conversion rights. However, you must apply for planning permission if your house is in a conservation area or if the windows extend more than 150 mm above the existing roof plane, exceeding the permitted limits.
Let’s explore all the UK government requirements in detail:
Permitted development rights
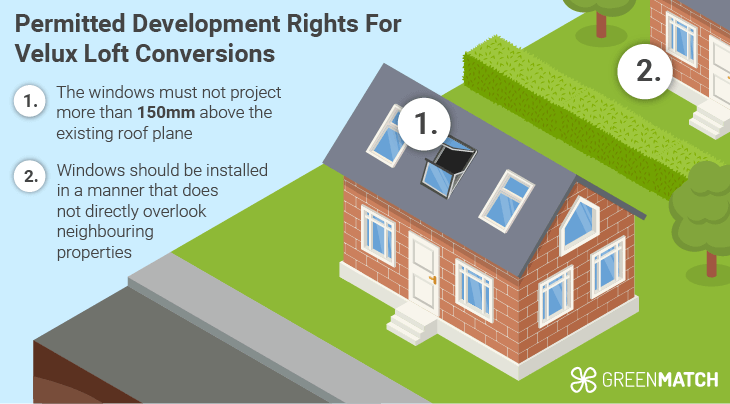
For many homeowners, Velux windows in a loft conversion fall under permitted development rights. This means you do not need planning permission, provided your plans meet specific criteria:
- Height of windows: The windows must not project more than 150mm above the existing roof plane. This keeps the installation flush or nearly flush with the roofline, maintaining the external appearance of your home.
- Positioning: Windows should be installed in a manner that respects privacy and does not directly overlook neighbouring properties. This can be achieved by careful placement or the use of obscured glazing.
It's important to ensure your property has not had its permitted development rights removed (this is common in some conservation areas or due to previous planning conditions), as this would require you to seek planning permission.
When planning permission is required
You will need to apply for planning permission in the following cases:
- Exceeding projection limits: If your Velux windows extend more than 150mm above the roof plane, they could significantly alter your house's external silhouette. Your local planning authority must assess and approve this.
- Location considerations: Homes in designated areas such as conservation areas, national parks, and Areas of Outstanding Natural Beauty face stricter regulations. Even minor changes like installing Velux windows might necessitate planning permission to ensure they conform to local aesthetic and environmental standards.
Planning permission for Velux Cabrio balcony
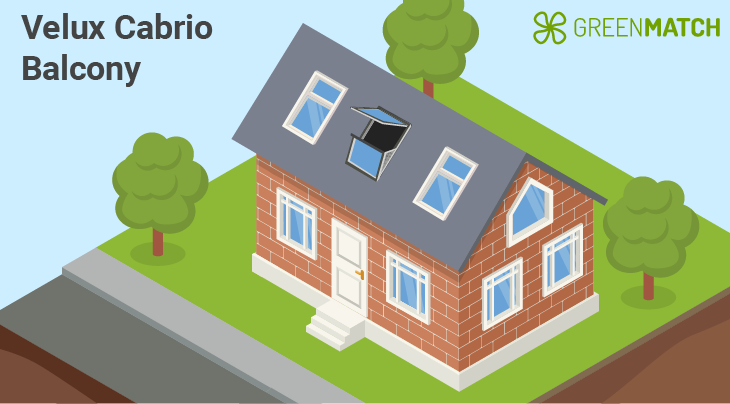
Unlike standard Velux windows, the Velux Cabrio Balcony generally requires planning permission.
The transformational nature of the Cabrio Balcony involves more substantial changes to the roof structure. This alteration is more pronounced than a typical flush-fitting roof window and can affect the building’s silhouette and external appearance.
When deployed, the Cabrio Balcony protrudes from the roof, creating a balcony space. This feature not only changes the external aesthetics but may also have implications for overlooking neighbouring properties, potentially leading to privacy concerns.
Given the potential impact on your home's external appearance and its relationship with surrounding properties, local planning authorities require a thorough review through the planning permission process. This ensures that the installation:
- Complies with local development plans: Each local area has its own policies governing development and building alterations, especially in how they blend with the local character and impact neighbours.
- Meets building regulations: Safety, accessibility, and structural integrity are paramount, particularly when altering the roof and adding elements like balconies.
Velux Cabrio balcony windows allow for more natural light and air to enter the home. This can reduce the need for artificial lighting and mechanical ventilation during daylight hours, decreasing energy consumption.
Choosing sustainable materials and high-quality windows can also make a difference. Velux often offers options that have better environmental profiles, such as sustainably sourced materials or recyclable components.
Rules and building regulations for Velux windows
Installing Velux windows must comply with strict building regulations for loft conversions, regardless of whether you need planning permission.
Following these rules is essential to ensure safety, improve energy efficiency, and consider environmental impacts. Below is a list of the main regulations you need to follow:
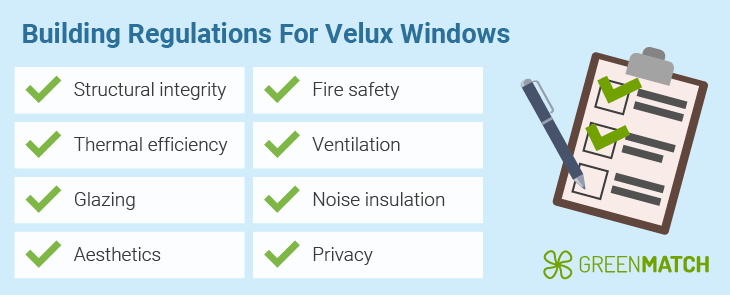
- Structural integrity: Modifying the roof structure for window installation must not compromise the building's stability.
- Fire safety: Materials used in and around the windows must comply with fire safety standards to prevent the spread of fire.
- Thermal efficiency: Windows must meet specific U-values to ensure they effectively contribute to the home's thermal insulation.
- Ventilation: Adequate ventilation is essential to prevent condensation and ensure a healthy indoor environment.
- Glazing: Where necessary, safety glass should be used to prevent injuries in the event of breakage. The placement and size of the windows should maximise natural light while minimising unwanted heat gain or loss.
- Noise insulation: In areas with high external noise levels, enhanced glazing may be required to ensure that window installations help maintain a peaceful interior environment.
- Aesthetics: Windows should be designed and placed to be sympathetic to the building's external appearance.
- Privacy: The orientation of windows should be considered to prevent direct overlooking of neighbouring properties, thus respecting privacy.
What is the 4-year rule for loft conversions?
The 4-year rule in the UK allows certain unauthorised building works, like loft conversions, to become lawful if they've been used for four years without the local authorities intervening.
If you've added Velux windows to your loft, but they stick out more than what's normally allowed (over 150mm above the roof), or you have a loft conversion in a conservation area, this rule could help you.
Your windows could be officially approved after four years without legal challenges. However, remember that this rule doesn't cover building safety standards, which you must meet regardless of the planning status.
Benefits of the 4-year rule
- Legal recognition: After four years of undisputed use, the conversion can receive a certificate of lawfulness, officially recognising the development as legal under planning laws.
- Increase in property value: Obtaining a certificate of lawfulness can increase a property's value as the living space's legal status is clarified.
- Security: Homeowners can feel more secure in their property rights after the passage of this period, especially if they were initially unaware of the need for planning permission.
Risks associated with the 4-year rule
- Risk of enforcement: If discovered within the four-year period, local authorities can enforce the unauthorised conversion, which might require reverting the property to its original condition or seeking retrospective planning permission.
- Financial costs: The process of applying for a certificate of lawfulness involves legal costs, which may increase the total cost of Velux loft conversion.
- Uncertainty: Living with the uncertainty of potential enforcement action for four years can be stressful.
- Impact on relationships with neighbours: Relying on the 4-year rule can strain relationships with neighbours, particularly if they perceive the development as negatively impacting their property or quality of life.
- Insurance implications: Some insurers may view properties with developments made under the 4-year rule as higher risk, potentially leading to higher insurance premiums or difficulties obtaining coverage.
The 4-year rule offers a pathway to legality for certain unauthorised loft conversions, but it comes with risks and does not guarantee freedom from enforcement within the initial period.
For Velux windows, as with any significant alteration to your property, it's generally wiser to seek planning permission or ensure compliance with permitted development rights to avoid potential legal and financial complications.
The legal status of your property remains unclear for four years, which can deter potential buyers and complicate selling the property. If discovered, local authorities can require you to undo the development or seek retrospective permission, leading to high costs and disruptions.
Properties with unresolved planning issues often see a decrease in value, which affects refinancing options and the potential sale price.
Even if you decide to rely on the 4-year rule, we strongly recommend consulting with loft conversion specialists first. These experts can explain the risks related to your specific property and provide detailed advice on how to proceed.
Each property is unique, and specialists can assess the potential legal and practical challenges you might face.
It's wise to compare loft conversion quotes from several specialists before choosing one. This will help ensure that you receive the best advice at the most competitive rate.
Get quotes from the best installers in your region. Fill out our quick 30-second form and receive up to 3 free quotes from our network of trusted local installers tailored to your home with no extra fees or obligations. Click below to begin!
- Describe your needs
- Get free quotes
- Choose the best offer
Guidelines for obtaining planning permission for Velux windows
Obtaining planning permission for Velux windows involves several steps. Here’s a clear, step-by-step guide to navigating the process efficiently:
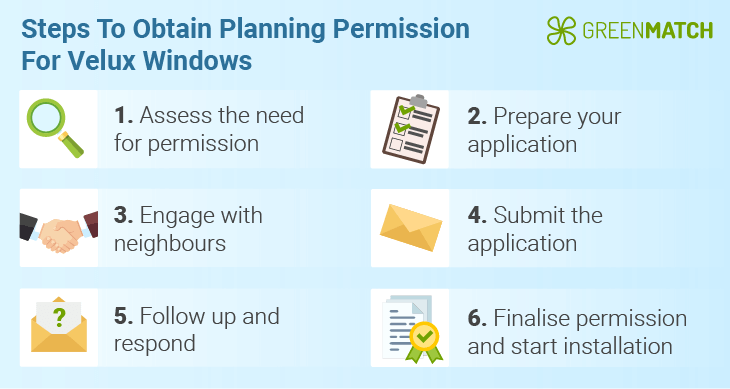
Step 1: Assess the need for permission
Begin by determining whether your loft conversion with Velux windows qualifies as permitted development. This status allows certain types of work without full planning permission.
Each local planning authority might have unique guidelines that specifically address roof modifications and loft conversions. It’s important to review these regulations thoroughly to ensure that your project complies with local planning policies and standards.
Step 2: Prepare your application
Include precise architectural drawings that showcase the Velux windows' placement and dimensions in relation to the interior layout and the exterior roof structure. These should be clear and detailed enough to show how the windows integrate with the existing structure.
Develop a comprehensive report that evaluates the potential impacts of the new windows. This should cover how they might affect light access for you and your neighbours, any privacy concerns they might raise, and their visual impact on the local environment and streetscape.
Step 3: Engage with neighbours
Before submitting your application, talk with your neighbours about your plans. This can help you proactively address any concerns and mitigate potential objections, facilitating a smoother planning approval process.
Clearly explain how the conversion will not only benefit your property but also enhance the neighbourhood’s appeal or property values. Be honest and open about your reasons for the modifications.
After your discussion, follow up with a summary of what was discussed, including any agreements or changes you plan to make in response to their concerns.
This written follow-up can help prevent misunderstandings and shows your commitment to maintaining good relations.
Clearly explain how the conversion will not only benefit your property but also enhance the neighbourhood's appeal or property values. Be honest and open about your reasons for the modifications.
After your discussion, follow up with a summary of what was discussed, including any agreements or changes you plan to make in response to their concerns.
This written follow-up can help prevent misunderstandings and shows your commitment to maintaining good relations.
Step 4: Submit the application
Assemble all necessary documents for submission, which include the completed application form, your detailed drawings, the impact report, and any other supporting documents required by your local council.
Submit the complete application packet to your local planning authority. Make sure to pay any associated fees at this time, as this is often required for the application to be processed.
Generally, the fees for submitting a planning application in the UK start at £200. It’s always best to check with your local planning authority for the exact fee for your specific project, as costs can differ based on the scope of work and the local council's fee schedule.
Step 5: Follow up and respond
Keep an eye on the status of your application through the local council’s planning portal or by direct communication. Being proactive about following up can help clarify any issues quickly.
If there are any objections from the public or suggestions for modifications from the planning department, be ready to adjust your plans accordingly. This might involve altering the design or placement of the windows.
Step 6: Finalise permission and start installation
The typical timeline for a planning decision is about 8 weeks, but this can vary. Once you have the green light, you can install the Velux windows as per the approved plans.
Make sure that all conditions specified by the planning authority are met during the installation. This includes any stipulations about materials, methods, or timelines.
Getting help from a professional like an architect or planning consultant can make obtaining planning permission for Velux windows much easier. These experts know the regulations well and can help you prepare all the necessary documents and drawings to meet local planning requirements, increasing your chances of approval.
Once you have planning permission, it's a good idea to get quotes from several contractors. This way, you can compare prices and their quality of work, ensuring you find the best deal and the most reliable professional for installing your Velux windows.
Fill out our quick 30-second form to receive up to three no-obligation, free quotes from our network of trusted local installers specifically tailored to your project needs. Click below to begin!
- Describe your needs
- Get free quotes
- Choose the best offer
FAQ
We strive to connect our customers with the right product and supplier. Would you like to be part of GreenMatch?
