
Get up to 4 quotes from our selected suppliers by filling in only 1 form

Save money by comparing quotes and choosing the most competitive offer

Our service is 100% free and with no obligation
Radiator Covers
A Quick Installation Guide
A radiator cover has the potential of transforming the unattractive look of your radiator into an eye-catching appearance that will impress your guests and make sure not to ruin the room’s furnishing style. Installing a radiator cabinet would serve a dual purpose: (i) positively contribute to the heating efficiency maximization by directing the heated airflow towards a designated area, rather than warming the adjacent walls for no good reason, and (ii) make sure that the often overheated radiator poses no immediate risks to those who can accidentally touch it. A properly designed cover shall not obstruct the heat exchange mechanism, which points to the importance of having well-designed grills at the bottom and at the top of the cover, whose purpose is to maintain a flue pipe effect, where cold air is being drawn from the bottom, and the warm air pushed from the top.
When it comes to the radiator cabinet heating efficiency, sustaining this constant flow of air is of the utmost importance, if you are looking to make the most of your radiator heating capacity. Therefore, it is desirable that you do not place any objects in the nearest vicinity, particularly at the bottom of the cabinet. In the event of installing a radiator cover, you would want to make sure that there is enough space around the radiator, that will allow for the radiator cabinet to be fitted in, bearing in mind that it requires that extra room, which is needed for maintaining the air circulation. Before looking for a radiator cover you would need to determine:
- its height from the floor (1)
- its depth from the wall (2)
- the width including the valves (the thermostats levers) (3)
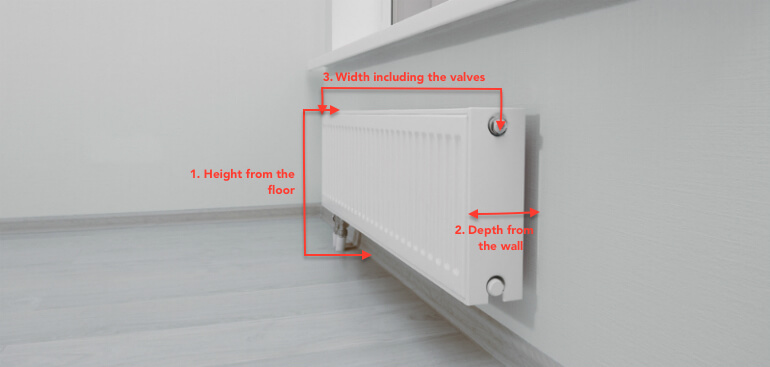
As a general rule, it is advised that you add 25mm to 40mm from each side of the radiator (depending on the cover type you are considering), in order to allow for the air circulation mentioned above. Once you have taken all the required measurements and made sure that the radiator cabinet will fit the assigned space, you might start looking for an actual cover. Depending on your budget allowance you can opt for wood, metal or fiberboard based cover. A wood cover is usually more expensive, though it will smoothly blend into the room’s decor without ruining the pleasing ambience an old fashioned house has to offer. A metal cover would cost you less, but it might not deliver the same aesthetic satisfaction the wood one does. Choosing between a metal or a wood cover would make a difference in terms of external appearance, but it would not affect the way the radiator heat is distributed. Hence, both the metal and the wood cover panels can be used in order to meet the customer’s expectations of an efficient radiator cover, with regard to safety and productivity projections.
In order to install a radiator cover you’ll need, a pencil or a felt-tip marker (whose marking can be easily erased), a tape measure, a notepad (so you could write down the measurements without having to bear these in mind all the time), a drill, and a screwdriver.
- Before installing the cover, it would be helpful to place all the assembling parts on the floor so you could quickly understand where the assembling process starts. Check the instruction manual in order to make sure that you have the right amount of fittings, and that you are not missing anything.
- It is not mandatory to have the cover attached to the wall, whereas most of the cabinets can be left free standing. Nonetheless, for safety and stability reasons, it is advised to fix the cover against the wall using the provided wall fixing pallets.
- Once you have assembled the cover’s frame, you could move it towards the wall in order to mark the spots where the fixing pallets would have to be installed, so you could start drilling holes/cavities into the wall. At this stage, it is important to make sure that the screws you are provided with, would fit the size of the holes you are making. Thus, before you start perforating your wall, it would be worthy to undertake a small drilling test on a piece of wood or plastic, and in so doing to be certain about the drill bit you will be using.
- Attach the wall fixing paddles using the screwdriver and the adequate fittings the way it is described in the instruction manual.
- As soon as the wall brackets are in place, you can lift the cover and fit it in against the wall, making sure that it matches the wall fixing loops, and that it does not leave any uncovered spots, in order to avoid the warm air escaping through the cracks, instead of being pushed forward into the room, as originally planned.


 We strive to connect our customers with the right product and supplier. Would you like to be part of GreenMatch?